Over time, the headlights of most cars become dull, yellow, and develop microcracks, which reduces light output and impairs visibility at night.
This occurs due to exposure to ultraviolet radiation, road chemicals, sand and small stones, which gradually destroy the top protective layer of polycarbonate headlights.
Drivers encounter this problem after just 3–5 years of operation, especially with frequent highway driving and when storing the car outdoors.
Dim headlights are not only a cosmetic defect, but also a real hazard: visibility is impaired, braking distances are increased, and oncoming drivers may notice you later than they should.
Many people try to solve the problem by polishing their headlights themselves, but with the right approach, you can achieve results close to those of a professional detailing center.
The main causes of clouding and damage to headlights
Ultraviolet radiation and the destruction of the factory coating
Modern plastic headlights are coated at the factory with a thin UV-protective varnish, which fades and degrades over time under the influence of sunlight. Once this layer is removed or damaged, the polycarbonate quickly yellows, becomes cloudy, and becomes more vulnerable to scratches.
Mechanical damage and abrasives
Sand, fine gravel, dirt, and car wash brushes act as abrasives and gradually "grind" the headlight surface, leaving microchips and scratches. Over time, this results in a matte, sandblasted surface that diffuses light and significantly reduces transparency.
Chemicals, reagents and improper care
Road reagents, harsh detergents, and household chemicals also damage the top layer of plastic. Frequently using inappropriate products or rubbing the headlights with a dry, sandy cloth accelerates the aging process.
Overheating and poor tuning
Installing more powerful bulbs without taking thermal conditions into account or using the wrong xenon can cause localized overheating and microcracks. As a result, the headlight becomes cloudy from the inside, and a simple external polishing will not completely solve the problem.
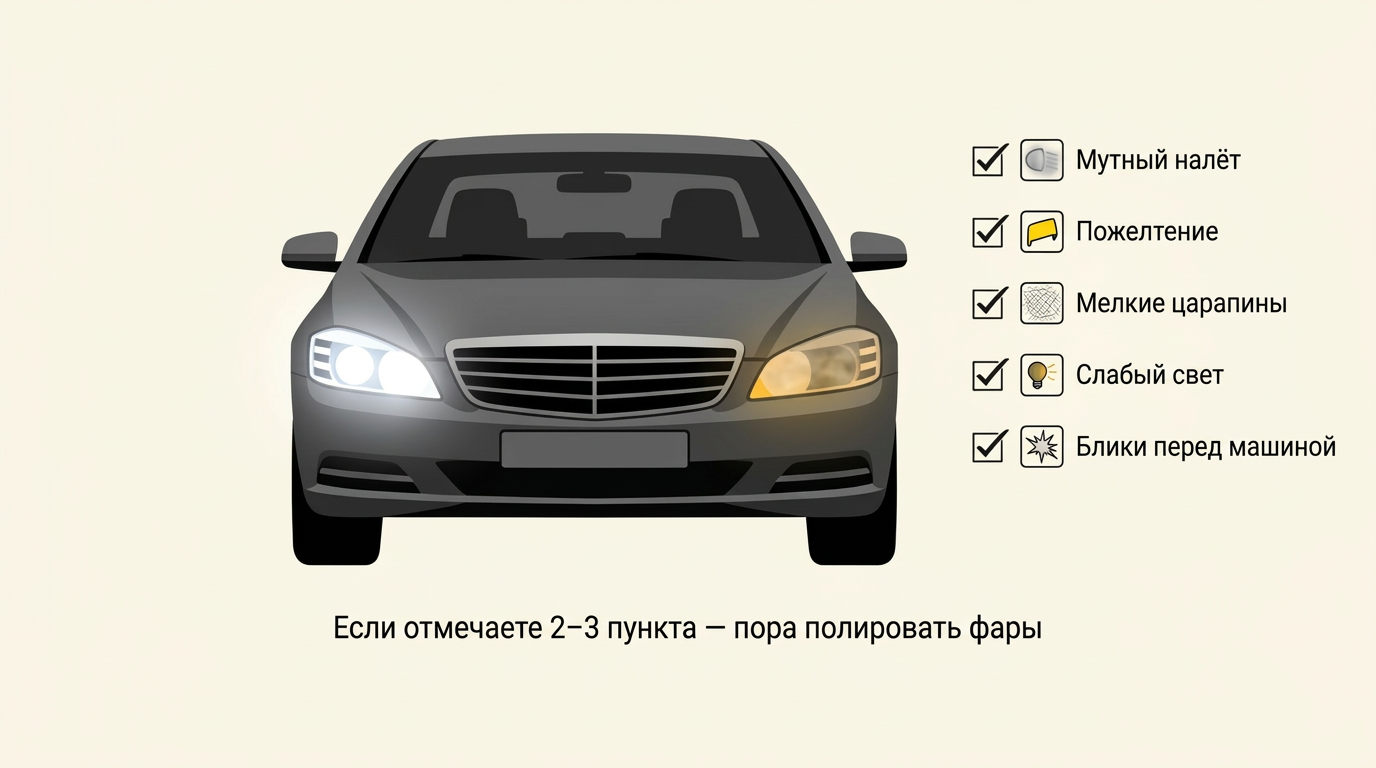
Signs and symptoms that your headlights need polishing
You can tell that your optics need restoration by several obvious signs.
Clouding of plastic, matte or “milky” coating on the outside.
Yellowing, especially in the upper part of the headlight, is very noticeable on light-colored cars.
A network of small scratches, traces of sandblasting, a noticeable roughness to the touch.
Decreased brightness of light, a “blurred” spot instead of a clear light and shadow boundary.
Glare and flare in front of the car, reduced visibility in rain and fog.
It's also worth paying attention to the behavior of the light: if the light is still weak despite the headlights being visually clean, the reflector may be worn out or clouded from the inside, and external polishing alone won't be enough.
The dangers of ignoring cloudy headlights
Reduced visibility and safety
Cloudy and scratched headlights scatter light, reducing road illumination, especially in rain, snow, and dimly lit areas. Research shows that severely clouded headlights can reduce light output by tens of percent, effectively increasing braking distances and driver reaction times.
Risk of accidents and fines
In poor lighting, drivers notice obstacles, pedestrians, and road markings later, increasing the risk of accidents. Furthermore, lights that are too dim or directed incorrectly may not meet vehicle inspection requirements, which can lead to a vehicle inspection being denied and potential claims from regulatory authorities.
Accelerated aging of headlights and additional costs
If clouding is ignored for a long time, the plastic will continue to deteriorate, developing deep cracks and chips. At a certain point, polishing no longer helps, and the headlights will have to be completely replaced, which is significantly more expensive than timely restoration and protection.
What can you check and do yourself?
Even without special equipment, you can perform a number of safe and effective actions:
Assess the degree of wear: slight cloudiness, severe yellowing, deep scratches.
Check the tightness of the headlight (moisture, fogging from the inside).
Inspect the body or fasteners for cracks - if there is serious damage, polishing will not help much.
Make sure that the light beam is approximately correct (it is better to make adjustments after restoration).
Preparation and materials
For high-quality results at home, it is usually recommended:
Waterproof sandpaper: P600–P800 for rough defects, P1000–P1500 for medium defects, P2000–P2500 (and higher) for finishing.
Masking tape to protect the body around the headlight.
Degreaser or car shampoo, clean water and microfiber.
Abrasive polishing paste for plastic and finishing (fine abrasive) paste.
If possible, apply a UV sealant or protective varnish/film for the final layer.
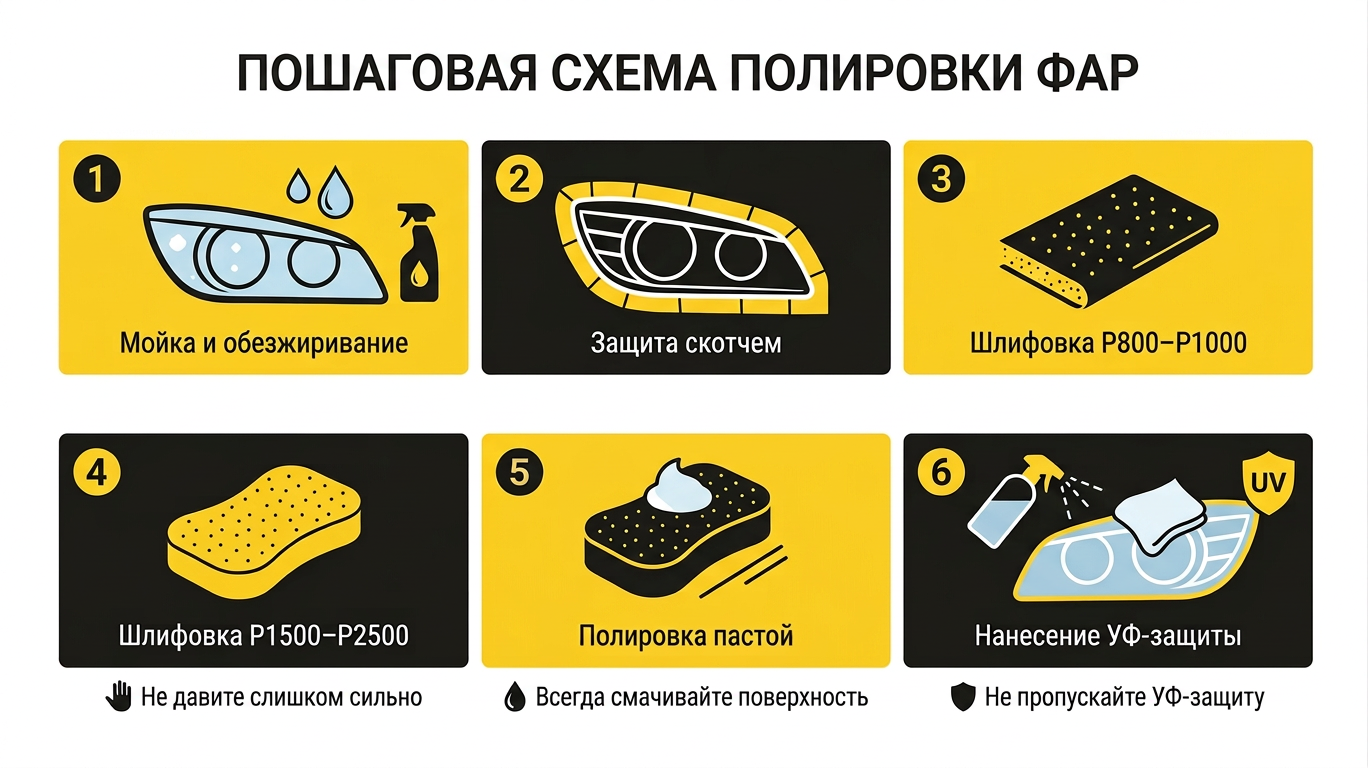
Step-by-step basic instructions for hand polishing
A step-by-step guide to hand polishing begins with cleaning and protection: thoroughly wash the headlights and the area around them with car shampoo to remove dirt and tar, then dry the surface and tape the edges of the fender, bumper, and hood around the headlight with masking tape to prevent damage to the paintwork.
The next step is wet sanding (matting). Start with a coarser grit, typically P800 to P1000, depending on the depth of the scratches. Continuously wet both the headlight and the sandpaper with water, sanding in one direction for 3-10 minutes until a uniform matte finish is achieved.
After this, move on to finer abrasives - P1000, then P1500 and then P2000–P2500, periodically changing the direction of movements from horizontal to vertical and vice versa in order to consistently remove the scratches from the previous sandpaper.
Next, polish with paste. Dry the headlight completely, then apply a small amount of abrasive paste to a microfiber cloth or polishing pad and polish with moderate pressure, using circular motions. Avoid working in one area for too long to avoid overheating the plastic.
Once the headlight is clear, use a finer grit finishing compound if necessary to bring the surface to a mirror-like finish.
After polishing, it's important to clean and degrease the surface: remove any remaining polish with a clean, damp microfiber cloth, and if necessary, degrease the surface with a suitable solution. Finally, apply a protective layer.
Evenly apply a UV sealant, special varnish, or protective film to the headlight to prevent rapid re-clouding and protect the plastic from UV rays and minor damage.
Then allow the chosen composition to fully polymerize according to the manufacturer's instructions: some varnishes require several hours and dry, dust-free conditions.
In short, the DIY process is as follows: first, wash and degrease the headlights, then protect the body with masking tape, then perform a step-by-step wet sanding from coarser to finer grain, followed by polishing with an abrasive and, if necessary, finishing paste, and finally, apply UV protection in the form of varnish, sealant, or protective film.
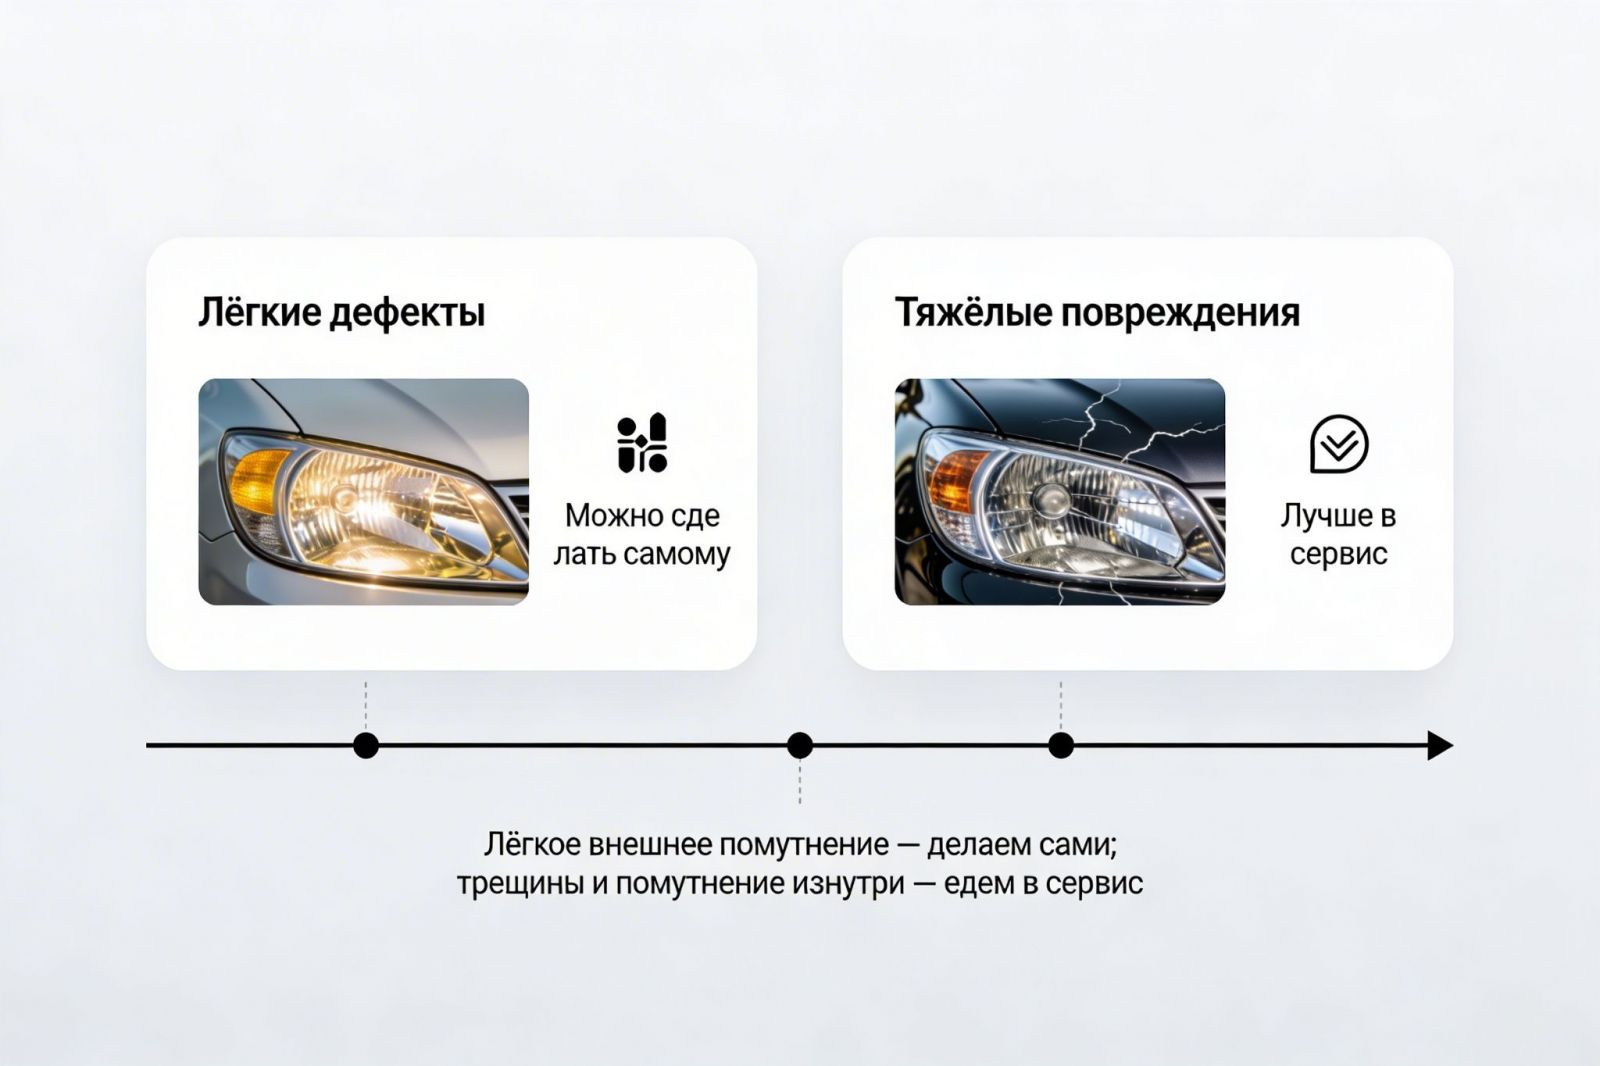
When is it necessary to contact service?
Even with careful work, DIY polishing has its limits, and in some cases it's better not to take the risk.
Contacting a professional service or detailing center is recommended if:
The headlights are badly cracked, there are deep chips and peeling plastic.
There is clouding from the inside, corrosion of the reflector, and a factory defect in the sealant.
The light is noticeably weak even after external polishing; there are problems with the optics or wiring.
The headlights need to be removed, painted or sealed.
You are not confident in your skills and are not ready to risk expensive optics.
Professional repair shops use speed-controlled grinders, measure layer thickness, apply specialized UV varnishes, and often offer a 1-3 year warranty on restored headlights. In cases of severe headlight damage, service polishing or headlight replacement is usually a more cost-effective solution.
Table: Causes → Symptoms → What to do
Cause | Main symptoms | What can you do with your own hands? | When to service |
UV radiation, fading of the protective layer | Yellowing, matte coating, uniform cloudiness | Wet sanding P800–P2000, polishing, UV sealant | In case of severe fading and cracks |
Sandblasting, abrasive mud | Minor scratches, sandblasted surface | Step-by-step sanding with P600–P2500, finishing paste | For deep chips and through cracks |
Aggressive chemicals, improper washing | Stains, localized clouding, plastic erosion | Light sanding, polishing, film protection | In case of severe deformation or loss of shape |
Overheating, powerful lamps, incorrect tuning | Microcracks, clouding from the inside, deterioration of light and shadow | Self-polishing from the outside gives a partial effect | Diagnostics and possible replacement of optics are needed. |
FAQ
Is it always necessary to sand headlights before polishing?
In case of noticeable scratches and pronounced clouding, wet sanding with fine sandpaper is necessary, otherwise the polish will not remove the defects, but only slightly disguise them.
Can you polish headlights with toothpaste?
Toothpaste does contain a mild abrasive and can brighten up mild cloudiness a bit, but the effect is short-lived and much weaker than with specialized pastes and proper polishing.
Is polishing alone without a protective layer enough?
No, without applying a UV sealant, varnish, or protective film, headlights often become cloudy again after a few weeks or months, since you have already removed the factory layer by sanding.
Can I drive immediately after polishing?
If only paste was used, then yes, but when applying varnishes and UV sealants, it is necessary to adhere to the drying and polymerization time specified by the manufacturer, often several hours.
Is it safe to polish outdoors in winter?
It is advisable to carry out work in a dry, not too cold room: low temperature and humidity impair the quality of grinding and especially the adhesion and curing of protective coatings.
Conclusion and recommendations
Regularly assessing the condition of your headlights and timely polishing with the application of a protective UV layer can significantly improve light output and postpone expensive headlight replacements.
In most cases, careful polishing of headlights yourself using the correct grade of sandpaper, high-quality pastes, and protection will produce results very close to those obtained by a service.
For preventative purposes, it is important to periodically wash the headlights with mild detergents, avoid rubbing them dry, use a protective film whenever possible, and avoid installing overly powerful lamps without taking the temperature conditions into account.
If the headlights are deeply damaged, clouded from the inside, or even after polishing them yourself, the light is still weak, it is wiser to entrust the restoration to a professional service.